Thank you for visiting SotAwiki, a Shroud of the Avatar Wiki Encyclopedia. If you see any information that is outdated, please take the time to update it, or if you prefer, leave a message for other editors. This community wiki is for the benefit of all Avatars!
Combat
 |
This article is currently under construction. You are welcome to help in its construction by editing it as well. |
 |
Combat in Shroud of the Avatar utilizes a Deck system and a Combat Bar interface that utilizes Combat Glyphs. Combat also consists of two different attack modes.
- New Britannia can be a hostile place. At some point, you may find it necessary to defend yourself.
- The Z key sheaths and unsheathes your equipped weapons and places you in and out of Combat Stance. Even if you do not carry weapons, you must enter Combat Stance to use combat spells.
- There are two primary ways to target and attack enemies, Auto-Attack and Free Attack. Each works a little differently, and you may toggle between them at any time by pressing the “Toggle Attack” hotkey (T by default).[1]
Combat Glyphs[edit]
- Combat Glyphs are icons that can be dragged from the Skills Window onto the Combat Hotbar to allow you to adapt to different situations at any time. Dragging a Combat Glyph onto the Combat Hotbar will cause the Glyph to incur a slight countdown time before the glyph can be used.
This section is outdated
- You can drag a skill into your hotbar from the Skills
or Glyphswindows (accessible from the Window Selector), as well as from one hotbar slot to another. Glyphs are skills and objects that can be added to your hotbar. Specifically, any Glyph can be added to your Combat Hotbar but only utility, summoning, and healing skills (like Light and Healing Touch), as well as potions, can be added to your Utility Hotbar.
Each slot in a hotbar can only be occupied by one Glyph, but the Glyph in each slot is up to you. If the new Glyph came from the skills window, the original Glyph will be replaced. If the new Glyph came from another slot on the hotbar, the two Glyphs will swap places.
Auto-Attack Mode[edit]
Whenever your Avatar is in Auto-Attack mode, the sword icon on the Combat Hotbar will flash red.
Auto-Attack mode makes the Avatar constantly attack any enemy they are facing that is also within range of their equipped weapon (provided the Avatar is in Combat Stance). You will continue to attack automatically until you move out of range or leave Combat Stance by pressing the Z key.
Auto-Attack mode does not allow you to charge attacks.
Free Attack Mode[edit]
Free Attack is an optional advanced technique option for combat that you can unlock during a conversation with most Adventurer Trainers, including master trainers.
Free Attack mode requires more active engagement in combat. When in Combat Stance, you will attack with your equipped weapon whenever you click the left mouse button. You must aim the reticle at an enemy to make sure your attacks hit.
Free Attack mode allows you to charge attacks for additional damage. To charge an attack, hold down the Left Mouse Button while in Combat Stance. A notched status bar will appear at the bottom of the screen and begin to fill. Releasing the Left Mouse Button releases the charged attack. The more notches are filled, the more damage the charged attack will do. Be aware that you may select a new target while left-clicking when your cursor is not over the target of your charged attack.
Small, light weapons (like daggers) have short charge bars that only contain a few notches. Heavier weapons (like polearms) have charge bars that contain many notches, allowing the delivery of mighty strikes.
Sticky Targeting and assigning a Soft Lock[edit]
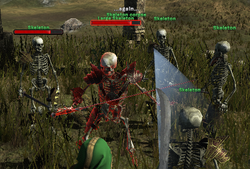
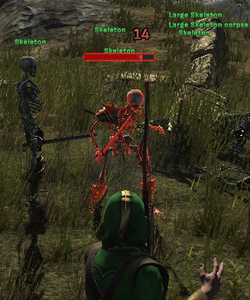
When in combat stance, the Avatar will target nearby enemies in range of their equipped weapon based on position and distance. A red highlight will “snap” to your target and follow them. You will generally target the closest enemy you can hit, centered in the direction the camera is facing.
 |
If you have multiple targets in range and are using a weapon that can hit multiple enemies at once (such as a halberd) a red highlight will remain over your primary target. If you no longer have any valid targets in range, then the white “X” will return to the center of the screen.
Sometimes you may want to attack something other than the closest enemy, such as an archer or mage in the back of an enemy group. To do so you can assign a “Soft Lock.” Attacks always prioritize your Soft Lock, and you will see their nameplate displayed next to yours in the upper-left of the screen.
You assign a Soft Lock by centering the reticle (or mouse cursor in Interactive mode) over an enemy, and double-left-clicking on them. A distinctive red highlight appears over your Soft Lock target. For as long as they are in range, and you are generally facing your Soft Lock target, projectile weapons and single target spells will alway be aimed at them. If you swing a melee weapon into a group containing your Soft Lock, the Soft Lock target will always be among the targets attacked.
 |
Pressing the “Next Target” key (TAB hotkey by default) assigns the closest target as your Soft Lock. Pressing Next Target again cycles through assigning nearby valid targets as your Soft Lock.
Other Avatars and friendly NPCs can be set as your Soft Lock by holding Shift + left-clicking on them. Hostile creatures need only be double-clicked on.
You may also set party members as your Soft Lock, which is useful if you want to heal or buff them during a chaotic battle. Spells like Healing Ray will always hit a friendly Soft Lock, provided they are in range and you are facing their general direction. You may set party members as your Soft Lock by clicking on their nameplates or pressing F1–F8.
Pressing Escape (ESC) clears your Soft Lock.